User guide / Workflow
After completing the configuration of HAT, open a command shell and navigate to the directory where you installed HAT. Execute the runHAT script and the main menu will be displayed. The figure below shows an example of HAT in action:
 ---------------------------------- BANKID HSM ACTIVATION TOOL ----------------------------------

 HAT modes:

 		1 - Activate merchant BankID
		2 - Renew merchant BankID
		3 - Test merchant BankID
		4 - Generate BankRA certificate request
		5 - Import BankRA certificate
		6 - Change bid-file password

 Enter HAT mode or Quit(Q). Default [1]..........................................: 1
 Enter the HAT configuration directory or Quit(Q). Default [.\props].............:
 Enter proxy host or Quit(Q). Default [null].....................................:
 Enter the activationURL or Quit(Q). Default [null]..............................: https://xx-bankid.no/TNA2Web/activate?ss1=dNIY%3D
 Enter the sharedSecret or Quit(Q). Default [null]...............................: 12345
 Enter the HSM PKCS#11 Driver (dll or so) or Quit(Q). Default [null].............: bp201w32HSM.dll
 Enter the NativeCryptoki location (dll or so) or Quit(Q). Default [.\nativelib\]: .\nativelib\Windows_x86\NativeCryptoki.dll
 Print Slot and Token Information: [Y,N] : ......................................: n
 Enter UserPIN for Token [SAKKA_AEP_DEV] on Slot [0] or Quit(Q). Default [null]..: 1111
 Enter bid-file storage directory or Quit(Q). Default [.\].......................:
 Enter the bid-file password or Quit(Q). Default [null]..........................: password1
 Please wait while HAT is generating 2048bits RSA KeyPairs on the HSM...
 Please wait while certificate requests are submitted to BankID COI...
 The BID-file was created successfully [.\cn90323020234-SomeBank.bid].
 ------------------------------------------------------------------------------------------------
HAT offers six different operations:
- Activate merchant BankID. Refer to section 2.1 for details.
- Renew merchant BankID. Refer to section 2.2 for details.
- Test merchant BankID. Refer to section 2.3 for details.
- Generate BankRA certificate request. This is the first step you must go through to activate a BankRA certificate. Refer to section 2.4 for details.
- Import BankRA certificate. This is the second step you must go through to activate a BankRA certificate. Refer to section 2.4 for details.
- Change bid-file password. Refer to section 2.5 for details.
After you have successfully completed operation 1, 2, 5 or 6, the .bid files are ready to be used with the BankID Server.
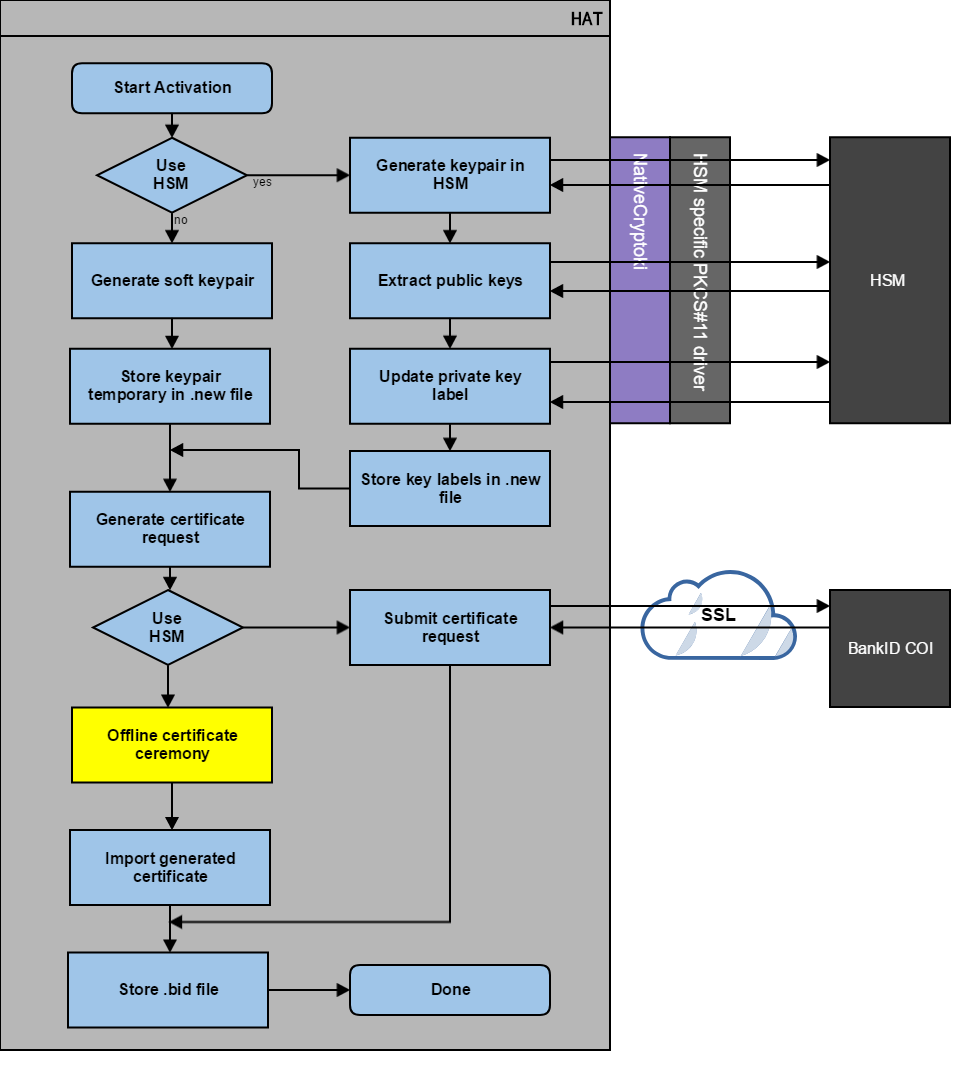
Common activation workflow
The following workflow is similar for all activation and renewal sequences. The workflow is executed once per keypair (i.e. twice for merchant BankID and once for BankRA certificates). Note that the bank that creates the activation URL also selects if a HSM should be used.
User Dialog Description
The following sections describe the user dialogs that might appear during HSM Activation Tool usage. The section titles refers to the questions from the command line interface.
Common sequences, configuration
Enter HAT configuration directory
The HAT configuration directory is the directory where the log4j.properties configuration file is located. Remember that HAT must have read access to this directory.
Common sequences, HSM connection details
Enter HSM PKCS#11 Driver
The HSM PKCS#11 driver varies depending on the HSM. If HAT is unable to load the entered PKCS#11 driver then enter the full path (e.g. /usr/lunasa/lib/libCryptoki2.so). Check that you have installed the necessary HSM software on the machine.
Enter NativeCryptoki location
The NativeCryptoki library is located under the nativelib directory. You must enter the full path to the library for your operating system.
Print Slot and Token information
Type 'Y' to view the slot and token (HSM) information.
Enter UserPIN for token
This is the PKCS#11 password used to log in to the HSM. The password is typically set using a HSM client provided by the HSM vendor.
Common sequences_ Proxy settings
Enter proxy host
HAT communicates with the BankID COI via SSL. If HAT is running on a machine that is behind a proxy server then enter the proxy host name when prompted. If there is no proxy, just press <Enter>.
Enter proxy port
If proxy host is set then the proxy port is mandatory. The value must be a number.
Activate merchant BankID
Enter activationURL
This is the activation URL as received from your bank. Example activation URL:
https://activation-preprod1.bankid.no/TNA2Web/activate?ss1=Ejqev2faJOwhdFA%3D
The URL above is just an example.
Enter shared secret
The shared secret is provided by your bank.
Enter bid-file storage directory
This is the directory where HAT stores the merchant .bid file. Remember that HAT must have read and write access to this directory.
Enter bid-file password
This is the .bid file password. This password must be at least 7 characters in length and contain one or more of the following special characters:
!,@,£,$,¤,%,&,/,{,(,[,),],},=,?,+,\,`, ,¨,^,~,',*,-,_,;,.,:,<,>,|,§,0,1,2,3,4,5,6,7,8,9
Renew merchant BankID
Enter BID filename
This is the existing merchant BankID used for authentication. This is also the file that will be updated during the renewal process, so make sure the user has write access to the file.
Enter bid-file password
This is the password of the existing merchant BankID. After renewal, the .bid file will have the same password as before.
Test merchant BankID
Enter BID filename
This is the merchant BankID used for authentication and signing during test.
Enter bid-file password
This is the password of the merchant BankID.
Generate BankRA certificate request
Enter test or production environment
Type 'Y' to use a file-based keystore instead of an HSM. This option is strictly for testing purposes and you should always choose 'N' when generating certificate requests for production environments.
Please note that if 'Y' is chosen, a .new file will be saved containing your private keys. This file must be stored until you import the BankRA certificate (refer to chapter 5.1.8).
Enter output directory
This is the directory where HAT finally stores the certificate request file (.p10 file). Remember that HAT must have read and write access to this directory.
Enter PKCS#10 filename
This is the certificate request filename. The extension .p10 will be appended to the filename if not provided by the input. If the file already exists, you will get the option to delete the existing file.
Enter bid-file password
This is only prompted when generating certificate requests using soft keys. The password will be used for protecting the private keys in the .new file, and must be the same as given while importing the BankRA certificate. The .bid file password has the same requirements as for the Activate merchant BankID. Refer to section 5.1.4.4 for details.
Import BankRA certificate
Enter test or production environment
Type 'Y' if you previously generated a certificate request using soft keys instead of an HSM. This option is strictly for testing purposes and you should always choose 'N' when generating certificate requests for the production environment. Please note that if 'Y' is chosen, a .new file must be present in the input directory.
Enter input directory
This is the directory where the certificate file is stored. The certificate file is obtained during a certification ceremony, and will have the extension .p7c. Remember that HAT must have read access to this directory.
Enter Certificate filename
This is the name of the certificate file received during the certification ceremony. The extension .p7c will be appended to the filename if not provided by the input.
Enter bid-file password
The .bid file password has the same requirements as for the Activate merchant BankID. Refer to chapter 5.1.4.4 for details. Note: When using file-based keystores, this password must be the same as entered during certificate request generation.
Enter output directory
This is the directory where HAT finally stores the merchant .bid file. Remember that HAT must have read and write access to this directory.
Enter file-location for .new file
This will only be prompted if using soft keys for test environment. The file location is the path to the directory where the .new file was stored during the certificate request generation.
Delete .new file
This will only be prompted if using soft keys for test environment. After the .bid file has been stored, the .new file is redundant and can be deleted.
Change bid-file password
Enter BID filename
This is the merchant BankID that will have its password changed.
Enter the bid-file password
This is the current password of the merchant BankID.
Enter new bid-file password
This is the new password of the merchant BankID. The .bid file password has the same requirements as for the Activate merchant BankID. Refer to chapter 5.1.4.4 for details.
Reenter new bid-file password
You must repeat the new password of the merchant BankID to make sure the new password does not contain any typographical errors.